Before I go into the equipment meltdowns I had a couple weeks ago, I want to give a huge shout out to John and the rest of the mechanics at Bob’s Bikes who have kept me up and running even when I put extreme loads on all of my equipment to the breaking point. They get me back up and running again every time!!!
Also, I’m reviewing an iBike sports product below. I believe these guys have put together a product, the iBike Dash plus Power, that gives data junkies like me everything they could ever want to know about their rides and their training! Here is a review of my initial experience with the iBike Dash plus Power after a couple weeks usage and the essential features that I am using day in and day out. First, let me point you to this Velonews article which has much better pictures of the iBike. Here are my pictures: (yes, my bike is filthy, but it is supposed to rain tomorrow and what point would there be in cleaning it up before it rains!!!)
 The iBike Dash plus Power phone booth setup (click to zoom in)
 The wheel speed sensor mounted on the front fork.
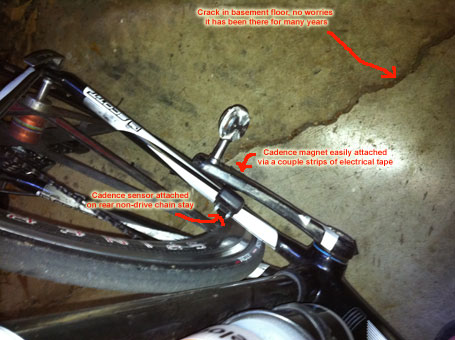
 The cadence sensor mounted on the non-drive side chainstay.
Initial review
Setup was super easy. You simply slide the iphone into the phone booth, and the iphone automatically connects to the Apple appstore to download the free app which is the display for the power meter. Make sure you either have a phone signal or are connected to a wireless network before inserting the iphone.

You can customize each of the training screens, but I primarily keep mine on the power gauge screen shown above. This has the most important statistics for me: power, average power, speed, slope, max slope, cadence, and heartrate. Note that power and heartrate are both color-coded based on user-configuable Functional Threshold Power and Maximum Heartrate. Also, note that these statistics are completely customizable in very much the same manner as any of the Garmin bike computers.
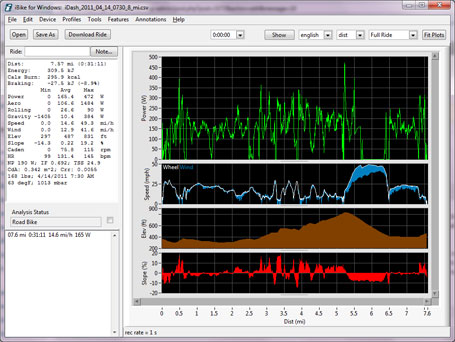
Downloading and analyzing the data is accomplished via email. Click on Options, click on Send Ride Files, and then click Send next to the ride file you want to send. The iBike stores the email address so you don’t have to type it in each time. Once you receive the data file, save it to your computer, fire up the iBike software, and then click open. Browse for the .ibd file that you just downloaded from your email. iBike automatically reads in the file and saves it to a .csv file compatible with Trainingpeaks. Or you can analyze the ride file from within the iBike software. I personally think that the iBike software has the best graph layout of any software on the market! Here is a screenshot of a typical ride file:
 iBike software ride view from top to bottom (power, speed/wind, elevation, slope)
Comparison with iBike Generation III
Prior to switching to the iBike Dash plus Power, I was using the iBike Generation III power meter. The Generation III meter is smaller, less expensive, and lighter than the iBike Dash plus Power. The larger size of the iBike Dash enables it to have more accurate wind sensor readings. Also, it allows the iBike Dash to have a beautiful large easy to read user interface. The older Generation III had an acceptable user interface, but there was no backlight so you couldn’t read it after dark.
NOTE about my iBike Dash plus Power setup: I am using my wife’s old iPhone 3G with no cellphone account activated on it, but it still works great recording all the GPS information and transferring files when connected via wireless network. But one of the big complaints against the old iPhone 3G is its slow processor, and you do notice that when running the iBike app. I would definitely recommend using an iPhone 3GS or iPhone 4, which have much better processors than the old 3G. Having said that, I am using the iPhone 3G and can put up with the slow response time especially when switching between windows.
Summary If you are a data junkie or looking for a more affordable way to measure power, the iBike Dash plus Power is the way to go. You get a sleek user interface, a handy carrying case for your iPhone, and all the data you could ever want. Contact me if you have any questions about the iBike Dash or shoot me an email to setup a ride with me where you can see it in action.
AND NOW ONTO THE EQUIPMENT WOES…
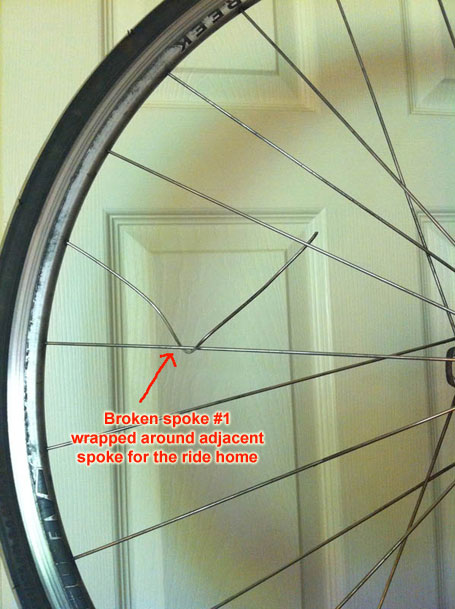
 Broken spoke #1
 Broken spoke #2
 Extra wheel tied to backpack, mid 90s Spinergy, iBike and Garmin mounted together
Here is a bulletted list for what didn’t make it into the picture:
- Sunday 4/3 – Broken front derailleur – I was climbing a steep grade and all of a sudden I hear a clunk/ping. I continue the climb but notice that my chain is rubbing on the front derailleur. On closer inspection at the top of the climb, I notice that there is a rivet missing from the front derailleur and so the whole derailleur is essentially split into two halves with the bottom part rubbing on not only the chain but also the front chainrings. I rode home very slowly trying not to ruin the chainrings. I ended up swapping out bikes and riding my old Trek after a little bit of work on it to make it rideable again and ended up just doing tons of climbing near my house – http://app.strava.com/rides/387911
- Monday 4/4 – Double flat – I was enjoying a slow, easy, wandering commute home with a ton of climbing when I started down the descent of Hackberry. I hit a small rock and heard the hissing sound of leaking air. Well, it turns out that it was a pinch flat (probably from not having pumped up the wheel in a week). I patched the tube and pumped it up to as high a pressure as I could with my frame pump (maybe 80psi?). I continued on my way home and then at the steepest part of the descent, which I was doing slowly, the tire went flat again. I was only a couple miles from home so I called Kristine to come pick me up, and she and Josiah came to my “rescue” a few minutes later! http://app.strava.com/rides/390412
- Tuesday 4/5 – Broken spoke – I was riding an old Cane Creek wheel because my Mavic training wheel was in desperate need of an internal hub cleaning to the point that it was no longer safe to descend at above 40mph without pedaling fast enough to keep the freewheel from spinning. The Cane Creek wheel was in pretty bad shape to begin with, but held together well on my Monday ride. Tuesday, though, I broke a spoke at the farthest out point of my ride. The rest of the wheel still had enough tension for me to ride home slowly. http://app.strava.com/rides/393157
- Wednesday and Thursday passed without incident.
- Friday 4/8 – Another flat tire – This was a puncture flat from a 10 week old tire with about 3600 miles on it. This was a rear tire which hadn’t worn through to the threads yet so I was surprised to puncture. I patched the tire up and made it home with no problems. http://app.strava.com/rides/401319
- Tuesday 4/12 – Another broken spoke – I was climbing up a hill in Mountain Brook and as I pulled over to a shady spot to pull out a powerbar from my backpack, I heard the familiar sound of a spoke breaking. I looked down and sure enough, I had another broken spoke. This one really put the wheel out of true, and I had to ride very slowly home to keep the tire from rubbing the frame. Definitely time to say good-bye to the Cane Creek wheel. $5 or best offer. Needs new spoke. Other spokes are frozen in place if you are looking to part out the hub you may need to cut the spokes off. http://app.strava.com/rides/419270
- Wednesday 4/13 – Extra wheel ride – All of this brings us to me riding home with my Mavic training wheel strapped to my back (photo above). And hopefully my run of bad luck / equipment breakdown is over for a while! http://app.strava.com/rides/424389
After hearing about all my equipment woes from the previous week, Roger hooked me up with these sweet Michelin racing tires, which I used for Dothan and Mississippi Gran Prix. Next up for these tires is Barbers this weekend and then USA Crits Speedweek (Athens, Roswell, Spartanburg, Dilworth, Sandy Springs). Also in this pic are the Rudy Project strydon sunglasses that I won from the January KOM climbing competition on Strava.

So that about sums up things, and randomly, here is my 4 year old mountain biking through the woods in our neighborhood. Check out those skills and no training wheels!

Leave a Reply